Honey Profiles
2025 Honey
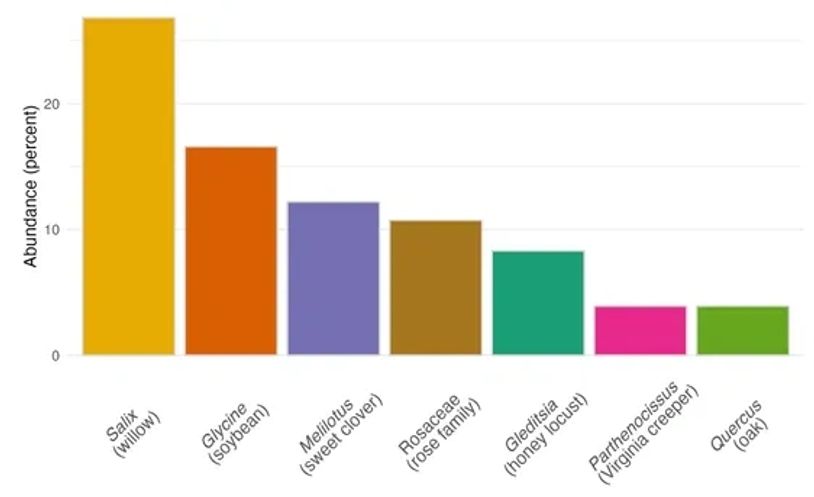
We had our honey analyzed by Mellifloral.
The primary pollen in this honey comes from willow, soybean, and clover, and each one brings its own personality to the jar. Willow catkins are the bold one of the bunch, giving the honey that first hit of deep, confident sweetness the moment it touches your tongue. Soybean and sweet clover step in right after with their mild, delicate notes, softening the edges and smoothing everything out. Because all three are blended together, the flavor ends up feeling pleasantly balanced—bright at the start, mellow in the middle, and easygoing all the way through.
For a more complete honey pollen profile, please click on this link.
Splitting hives
If conditions exist to allow a hive to expand the bees will eventually outgrow their home. At that point they create a new queen and then the old queen and about 2/3rds of the worker bees will leave (or swarm) to find a new home. There are several ways to discourage this but in our case we want to expand the number of hives we have so we’ll use a technique called splitting, basically splitting one hive into two hives, before swarming occurs. To determine if a hive is preparing to swarm we inspect the hive frames to look for queen swarm cells (more on this below).
There are multiple ways to split a hive, but our preferred method is the walk away split. This is essentially dividing up the hive resources as equally as possible into two new hives. The resources would be frames of bees, pollen, nectar, and brood. One of the new hives will contain the queen, the hive that doesn’t will raise a new queen.

Our 6 new hives ready for splits.
Queen Cells
Our New Hives
Our New Hives

Queen cells are large waxen cocoons that sort of look like peanut shells that the bees construct to rear new queens. If they are along the sides or bottom of the frame they are probably swarm cells which means the hive is getting ready to swarm and you need to take some action. If they are in the central portion of the frame they may be supersedure cells and it's more likely the colony is just raising a new queen to replace an aging queen. This image is from The Honey Bee Suite which is a great resource for all things bee keeping. https://www.honeybeesuite.com/is-it-a-swarm-cell-or-a-supersedure-cell/
Our New Hives
Our New Hives
Our New Hives
Our hives after splitting. We've starting feeding pollen patties and syrup to help get the new hives off to a strong start. We'll also be inspecting to make sure every hive eventually has a queen and is rearing brood.
Preparing hives for spring
Fortunately, 6 of our 7 hives (colonies) made it through the winter in good shape. We’re not sure why the hive that failed did fail as it still had food remaining and did not appear to fall victim to disease or infestation.
Preparation for spring basically involves, in our case at least, removal of insulation and mouse guards, inspecting the hives, and providing food if necessary to promote brood rearing so the hive gets off to a strong start. We have also prepared boxes for six additional hives that we'll get from splitting the current hives in addition to lots of supers (honey collection boxes) for what we hope is our biggest harvest so far.

Our six remaining hives ready for spring.
Our custom painted medium honey supers ready to go on the hives!
We assembled and painted about 30 new hive boxes over the winter in anticipation of expanding our hive numbers in the spring. We think that bees prefer elaborately painted hive boxes over plain wood or white boxes and that this leads to improved honey production (we have no proof of this and we have no plans to confirm). We also think the elaborately painted boxes lead to an improved overall sense of wellbeing, maybe not for the bees but definitley for the person painting the boxes:).

GETTING THE BEEHIVES READY FOR WINTER
Insulating the Hives
There is an enormous amount of information online regarding insulating (or not insulating) bee hives for the winter. From what we have been able to ascertain bees should be able to tolerate temperatures as low as -20 F as long as they stay dry and don’t starve. Bees cluster in the hive during the winter, fanning their wings to generate heat. The heat can cause condensation to form in the in the hive and if the bees get wet it can be disastrous. (Left image: Loading up the hive insulation panels. They are hinged so they can be stored flat when not installed and are easier to transport).

For our hives we’ve decided for now to be cautious and apply insulation. We also make sure there is some ventilation in the hive to hopefully prevent or limit condensation. In addition to the insulation we install mouse guards over the hive entrance and install solid panels in the hive bottom board (our hive bottom boards are ventilated, and we leave them open in the warmer months). Mice can enter the hives during the winter looking for warmth and food. The mouse guard is large enough for the bees to come and go easily but is too small for the mice to enter.
For our insulation we used 1 inch thick foam board insulation with an R value of 6. We also placed a 2 inch thickpiece of foam board insulation at the top of the hive under the top cover. The exterior insulation is held in place with ratchet straps and to prevent the webbing from crushing the corners of the foam board we used either wood blocks or drywall outside corner molding. We copied the insulation wrap design construction from this guy- https://www.youtube.com/watch?app=desktop&v=qWFR0-yLh9w&t=0s.
(Right Image: A few of our freshly insulated hives. We installed these just a few weeks ago on a relatively nice November day when it seemed they weren’t really necessary. As I’m writing this it’s about 13 degrees F outside with 20+ MPH winds)
Varroa Mite Control
Bee hives will eventually get infested with a parasite called the Varroa mite. If left untreated the Varroa will weaken and destroy the hive. We regularly check our hives for Varroa and if the mite infestation is sufficient, we treat with either Oxalic acid vapor or Formic acid. Oxalic acid is an organic compound found in nature within many plants, including vegetables, leafy greens, fruits, nuts, and seeds while formic acid is an organic acid that is naturally present within honeybee colonies. There are other non-organic treatments available but we’ve had good success with these treatments so far and like the idea of treating with naturally occurring substances. There is an enormous amount of information available online if you’d like to learn more about the Varroa mite and the available treatments. I’ve included a few links below.
For Oxalic acid treatment. We use a device from Lorob Bees called InstantVap to apply the treatment. The device heats the acid to create a vapor that is then injected into the hive. Each treatment only takes a few minutes.
For the Formic acid treatment we use a product called Formic Pro. These are pads saturated with the acid solution that are placed in the hive directly on top of the frames. The treatment takes 14 or 20 days depending on the process you use.
https://beelab.umn.edu/varroa-mites
https://nodglobal.com/what-makes-formic-acid-so-special/
https://www.perfectbee.com/a-healthy-beehive/threats-to-bees/a-beekeepers-guide-to-using-oxylic-acid

This is an image form our most recent Oxalic acid treatment.
Making sure the bees have enough food
Raising bees involves specific activities for each season. During the fall we started monitoring the food stores to make sure the bees had enough to make it through the winter. To do this you can either inspect the hives to see how much honey is stored or you can lift the hive to estimate its weight. A double 8 frame brood hive should weigh about 80 ibs going into winter (bees + hives + honey). We estimate weight by lifting the back of the hive up off of the stand. We’re not totally confident yet in our ability to estimate if the bees have enough food so we decided to feed.
We started feeding a simple syrup (2 parts sugar to 1 part water by weight) in early fall. We added a supplement called HoneyBee Healthy to the syrup that is thought to stimulate feeding. This stuff is expensive and you can find recipes online to make your own for a fraction of the cost. Once daytime temperatures reach the mid fifties (Fahrenheit) it’s generally advised to stop feeding syrup and switch to a sugar brick if feeding is still necessary.

Syrup feeding jars and stand.
We weren’t certain if our bees had enough food stores after feeding the syrup, so we decided to supplement their existing stores with sugar bricks for a little insurance.
For feeding syrup we use an inverted canning jar with a bunch of small holes (maybe 1/16th of an inch dia.) punched in the lid. The jars are placed in a wooden stand so the bees can access the syrup as it slowly drips through the holes. The feeder is placed in an empty hive box that is placed on top of the brood hive where most of the bees live. Our bees were typically consuming 1-2 quarts of syrup per week. There are a lot of different feeder types available. The jars are nice because they are easy to clean and you can check syrup levels at a glance.
The sugar bricks we use for overwinter feeding are primarily sugar with a small amount of water. It’s also common to add vinegar to prevent mold growth and certain essential oils thought to stimulate feeding. We place the bricks in a wooden frame with a screened bottom that sits on top of the hive brood frames. Click on Hone on this website to find a detailed description for starter bee hives. A good instructional article on how to make the bricks is here: https://wildreidranch.com/diy-sugar-brick-recipe-for-bees/

Sugar bricks
BEE-VILLE UPDATES
Still Collecting Pollen
Still Collecting Pollen
Still Collecting Pollen
It's November and we've started winter preparation. We placed mouse guards and bottom boards. We're making sugar bricks to ensure that bees will have enough food throughout winter. We're just waiting for the first freeze, maybe in December, before putting in these bricks, to make sure that all of those nasty yellow jackets are gone. And, most importantly, we've treated the bees one more time for varroa mites using oxalic acid. We'll talk more about treating bees later. But this Ohio weather continues to be mild. Our hardworking bees are still out and about collecting pollen. It's fun to watch :).
Bee Inspection - ✔
Still Collecting Pollen
Still Collecting Pollen
Today, Sep 13, 2024, the Logan County Bee Inspector came over to inspect our bees. Nathan Davis is a successful beekeeper himself and co-owner of Nate's Nectar. He provided multiple tips such as when to treat the bees next with oxalic acid, when to start feeding the bees, and how to carry out the alcohol wash inspection more easily. He inspected three hives, Clover Village, Buzz Station, and Pollen Tower. He even spotted the queen of Buzz Station. We named that queen, Artemis. The inspection went well and our bees were deemed healthy. Woohoo!
Our First Honey Harvest
Our Bee Village is Growing
Our Bee Village is Growing
Finally, we have harvestable honey! We were originally concerned that we won't have any to harvest this year, 2024. But our bees worked miracles. Every 2-3 weeks, it felt like we needed to add a super box because the bees looked like they were running out of space to store nectar and make honey. Then, this 24th of August, we collected frames with capped honey and then extracted rich dark amber honey. We managed to fill out only two 5-gallon buckets. For a first harvest, we think it's wonderful.
Our Bee Village is Growing
Our Bee Village is Growing
Our Bee Village is Growing
Coming out of winter, we have only three surviving hives, 50% of the original number. We lost a couple to varroa mites and one to an attack by yellow jackets. These were traumatic experiences. But the remaining bees were resilient and apparently have strong queens - and queen-making abilities. Good thing we were prepared and prevented swarming. Now we have eight healthy hives. Yes, we were crazy enough to give each hive a name. And we're hoping that they will all survive this coming winter.

Building the Bee Village
Our Journey into Apiary
When we thought about getting into beekeeping, all we can think of is honey!
Imagine, all the pure raw honey we can harvest for ourselves.
But when we started planning and executing the plan, we quickly find ourselves with more than a hive-ful of work!
And we are sharing our beekeeping adventures here
HONEY for SALE
12 oz or 340 g (NET WT) = 8 fl oz
24 oz or 680 g (NET WT) = 16 fl oz
24 oz or 680 g (NET WT) = 16 fl oz

$8.00 per bottle
You can purchase this size through Etsy by clicking the button below.
Or, if you have questions, please contact us, loganshirefarming@gmail.com.
24 oz or 680 g (NET WT) = 16 fl oz
24 oz or 680 g (NET WT) = 16 fl oz
24 oz or 680 g (NET WT) = 16 fl oz
$14.00 per bottle
You can purchase this size through Etsy by clicking the button below.
Or, if you have questions, please contact us, loganshirefarming@gmail.com.
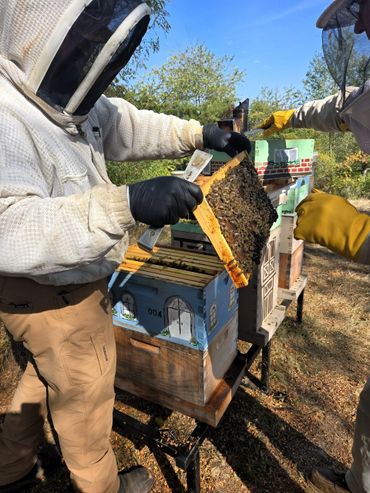
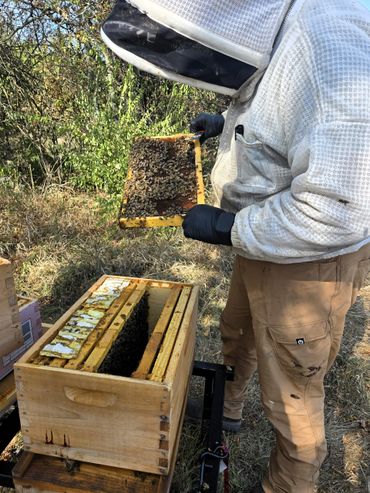
Just a few bee inspection pictures to share